Posts

Showing posts with the label Nail Tool

Elegant Valentine’s Nails

Image
  I know Valentine’s Day is over, but I didn’t want to do green for St. Patrick’s day just yet. They wouldn’t last. I used the cream color from these browns, and then put a matte top coat on. I used these nail tools  to put black hearts on my thumbs and lines on my other fingers. I used the same black on my ring finger. Then I used the nail tools and painted a top coat over the black lines and hearts and used the regular brush to put the top coat on my ring finger. Once it’s cured I put  this pink metallic powder  over the black designs and on my ring finger. Then I put the top coat on again and cured it. I really like these! One of my favorites!

Christmas Nails

Image
   I love doing my own nails, but there are a few months that I enjoy more than others and Christmas is one of those. This year I went simple. I painted red, green, and white, used red and green sparkles, and then used  this tool  to paint red hearts and green dots, to look like holly.

Thanksgiving Nails

Image
  These are some of my favorite nail designs that I have done! I used a cream color from the browns that I got. Then I used  this nail tool  and did the colored dots. I did one color at a time and cured it with the uv light. I used red, orange, dark yellow, green, and brown.

Fall Thanksgiving Nails

Image
  I didn’t have any brown nail polish, so I got this set that has six different browns.  I wanted to see how they all looked, so I painted all of them on my nails. The lightest color I used to paint the pumpkins on my thumbs. I used  these tools  to paint the pumpkins.

Fall Nails

Image
  Even though I am not ready for summer to be over, I painted my nails for fall since it is September. Haha! I used a red, olive green, orange, mustard yellow, and white. I used  These Nail Tools  to do all the designs and then did a matte top coat.

Summer Nails

Image
  Doing my own nails is something I really enjoy doing. It also is less expensive and takes way less time.  Sometimes what is in my head comes out exactly the way I wanted and I absolutely love them. Then other times not so much and I really don’t like them, but I leave them because I don’t want to waste the nail polish and the time. This time is one of the times I absolutely love the way they turned out! I used a light blue, pink, yellow, and white. I used  these tools  to make the flowers, and polka dots. Then I used  this stencil kit  to make the lines on my other nails (I used the leaf pattern). I each hand different.

Christmas Nails

Image
  Lydia loved her Christmas nails so much from last year ( These Nails ) that she wanted them painted the same this year. We did do yellow sparkles instead this year. I used  These Nail Tools  and  This Nail Tool  to paint the Santa face and the lights. I really should get some brushes! lol  For the Santa face I used a light pink/peach color and painted her whole thumb nail with it. Cured it with the light, then painted the red sparkles. Cured it, then used the nail tools and put “dots” across the red line, and the tip of her nail (for his beard). Cured it then used the nail tools to put black dots for the eyes and a light orange for his nose. Then cured them. For the rest of her fingers I painted them white and then put the sparkles over the top for her pointer, middle, and pinky fingers. For her ring finger I used black for the light string and then this year I used these  Glow in the Dark  nail polish for the lights. They light up so good, it’s...

Spring Nails

Image
  For my birthday I got these  Magnetic Nail Polish . I painted my pointer and middle fingers with a pink/green color with a shiny topcoat. Painted my thumbs in white with a matte top coat. Painted my ring fingers and pinky’s with white, used  This Nail Tool  to paint purple dots and “flowers”, and then put the shiny topcoat on.

Spring Nails

Image
  For my nails this spring I used a coral color, purple, yellow, and then painted those colors in flowers (using This Nail Tool ) on my ring finger that I painted gray first. Then I used the matte top coat on all my fingers and thumbs except my ring fingers. I used the normal shiny topcoat on.

St. Patrick’s Nails

Image
This year I painted my nails for St. Patrick’s Day with white and I used these Nail Tools  to paint a light green shamrock ☘️ on my thumbs; black with this  Metallic Green  on top on my pointer and middle fingers and my pinky’s; then white with a pinkish/goldish sparkle on my ring fingers.

Christmas Nails

Image
  This year for Christmas Lydia and I searched Pinterest for some ideas. We came across some cute ones with Santa. She loved them and I did my best. On her thumb I painted the Santa.  For the Santa’s face I used a light pink/peach color and painted her whole thumb nail with it. Cured it with the light, then painted the red sparkles. Cured it, then used the nail tools and put “dots” across the red line, and the tip of her nail (for his beard). Cured it then used the nail tools to put black dots for the eyes and a light orange for his nose. Then cured them. I painted her pointer fingers with green sparkles, her pinky’s with red sparkles, her middle fingers red, and her ring fingers white with then black for the light strings and bright colors for the lights. I put the glossy top coat on all of her fingers except her middle fingers. I put the matte top coat on them. I think they turned out really cute!

New Nail Tools

Image
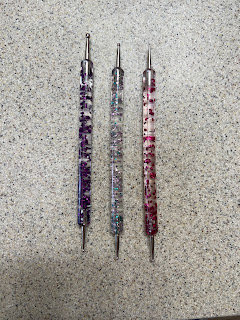
  The other day when we were at the dollar store we found some new nail tools, this is my  other nail tool . These have more sizes on the ends and I love the “colors”.  

Nail Stencil Set

Image
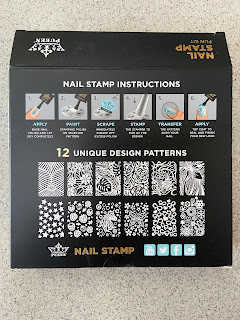
For Christmas Nick's parents bought me this nail stencil set.  I have been having a very hard time getting it to work.  It says to only use the nail polish it comes with, but when I do, it dries so fast that the stamper it came with won't pick it up.  I have tried SEVERAL times, and it just doesn't work. I have even tried doing it on Brichette's nails, and working as fast as I can, still didn't get a good design on the stamper.   So today, I used some of the gel polish on it and it worked great!  I used the light to "dry" it on my finger after stamping and it looks good.  Here is the blog post with my nails I painted with the stamper for Valentine's Day Nails . I don't know if I'm doing something wrong with the "special" polish it came with, but it just doesn't work. I put the polish on, use the scrapper to smooth it out over the stencil, use the stamper and nothing comes off.  The stamper is blank.  It's so frustrating.  At l...