Posts

Showing posts with the label Cooking

Dehydrator

Image
  We bought a dehydrator from  Dash  in March of this year and absolutely love it.  It's not very loud, and it works great. Plus right now (August 4, 2023) it's on sale for $39.99! What!! We have dehydrated strawberries, apples, mangos, bananas, and now I can't remember what else.  lol  I will be dehydrating herbs like Rosemary, Oregano, Sage, Thyme, Lemon Balm, and others. You can do jerky and so many other things.

Honeycomb Waffle Iron

Image
  As you may know my name in Greek means Honey Bee (Melissa in Greek: μέλισσα). So when Dash made a  Honeycomb Mini Waffle Maker  I just had to have it. Lol! We usually use  Kodiak Mixes  for pancakes and waffles because they have a lot of protein in them. Sometimes I will add 1/2 a cup of my  Sourdough Starter  to the mix. It makes them so moist and fluffy! I really enjoy these mini waffle makers, obviously since we have several of them. Lol!

Sourdough 101

Image
Sourdough help for beginners (this is me!) I started this post last year and forgot to finish it. Oops. 🙊  So I’ve been trying to make my own sourdough starter. It was going really well for the first few days, but then when I had to discard some of it and use a small amount of the starter to feed, it quit growing. So I started over and it didn’t work again. I decided to buy unbleached flou r to see if that was the problem. I started over again and it was going good, but then my starter grew mold. 😭 So today January 26th 2022 I started yet again.  I was confused about some of the process. I keep seeing everyone with discard and making recipes from it. If they are using discard what are they using for bread? How much of their starter do they keep? How much do they feed their starter? So I’m going to break things down to hopefully help others understand more about sourdough. Supplies needed: Starter Unbleached Flour Warm Water (not over 110°) Salt Scale Measuring Cups Mixing Bo...

Sourdough loaf

Image
  Here is the first loaf I did.  I read that if my proofing basket is new that I should spray it with water before flouring it. I did that, but then when it was time to take the dough out, it stuck to the fabric. So I rinsed it with water and let it dry. Then I put lots of flour in it for my second loaf. That worked so much better! Also, when I cooked it, the parchment paper stuck and cooked to the dough. So for my second loaf I sprayed the parchment with some cooking spray and that worked great! Here is the proofing basket. You can see the dough stuck to it. Here is a picture of the inside.

Sourdough

Image
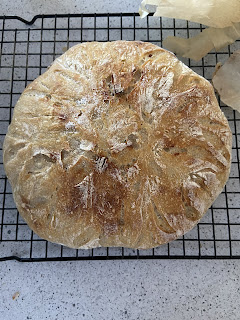
  Here is my second loaf of sourdough. It turned out so good. I really love the flower/sunshine design that I cut in to it. Have you tried making sourdough yet?

Sourdough Starter

Image
Yep! I am going to try and make sourdough! I am so excited! I am using a recipe from  Bless This Mess Blog . Her name is Melissa and she has so many wonderful recipes!  I bought mason jars from Target. I also bought a wooden spatula from  Ballerina Farm . I was told that using metal isn’t good. But I’m not sure. I haven’t done to much research about that, yet! Yesterday, January 6th was the day I started my starter. I have to feed it (give it flour and water) every 24 hours (give or take) for about a week. Once it’s pulled enough natural yeast from the air and gets nice and bubbly then I can start making bread! 🎉  Today I fed it. I hope it’s working! If you want to see videos (they aren’t working for me to upload them on here) you can check out our Instagram (Hechfamfarm98). I’ll keep updates here as I go along!

Peach Chicken

Image
I have been trying to find a good recipe for orange chicken. I still haven’t found one, but in my search I came across one recipe that called for orange jam. Well, we don’t have that. We have strawberry, grape, and raspberry that we make. Then I thought, oh! We have peach jam that my aunt makes. So I substituted it for the orange and… WOW! It is delicious!! So here is the recipe: although, unless you have my aunts homemade jam, it might not be as good. 😉 1 cup peach jam 1 cup bbq sauce (we use Sweet Baby Rays) 1 tsp Onion Powder Sprinkle of Soy Sauce 2-3 chicken breasts cut in chunks Add all ingredients into a crockpot. We just use a few squirts of the soy sauce because we are not to big on it. However, if you like it you can add as much as you want.  Cook on low for 6 hours or on high for 4.  We use our rice cooker and make some white rice to go with it.

No Clump Mac & Cheese

Image
  I found an easy way to make sure there are no clumps in Mac & Cheese! I’m talking about the boxed kind that you get from the store. We have had Kraft, Kroger, and WinCo brand. We’ve had others once or twice before, but can’t remember their names. Our favorite... WinCo brand! Yep! We love their brand. It’s the best tasting to us. Back to how I make it. So I cook the noodles. Then I add the butter and milk to the hot pot, and put it back on the burner I cooked the noodles on (with the heat turned off). I keep it on there just long enough to melt the butter and warm the milk. Then I take it off the burner and add the noodles back to the pan. I stir the noodles in the melted butter and milk, until they are all coated. I then open the pouch of cheese and add it in. I stir the noodles and cheese until it’s well mixed. With the noodles coated in the butter/milk mixture, it helps the cheese not clump. Hopefully making it this way helps you from having clumps. There is nothing worse t...

Dinner Rolls

Image
  This dinner roll recipe is so good. I make them all the time and they go with pretty much anything! Although, doesn’t any bread? lol Dinner Rolls Ingredients: 1 cup Hot Water 2 Tbsp Salted Butter 2 tbsp Honey 1/2 cup cold milk 1 Tbsp Active Dry Yeast 4 cups Flour 1 tsp Salt Extra butter for the tops Directions: Put the yeast in the bowl of your stand mixer. In a microwave safe container put the hot water and add the butter. Microwave 45 seconds. Add the Honey and mix around until it is dissolved. Add the cold milk. Check the temperature and make sure it’s not above 110°. Slowly pour the mixture into your mixing bowl. Let sit for 5 minutes so the yeast can activate. Sprinkle the salt in and then add the flour. Mix until it’s not sticky to the touch and pulls away from the sides. Mix for a couple minutes. Take bread hook out and cover with a hot damp towel and let rise for 15 minutes. Spray a 9x13“ baking dish with cooking spray. Divide the dough into 15 equal balls. Place in bakin...

Spices

Image
I hated how we were storing our spices. It felt so disorganized and chaotic with them all being different sizes and shapes. So  I decided to change that. I bought glass jars from a .99 and more store by our house. We bought labels and wrote the name of the spices on them. We bought the baskets from Family Dollar. Nick installed a shelf in the cabinet above the stove. It’s so nice. I can pull the baskets out... it’s all organized and the same. I love it. The little baskets have the food coloring and flavoring (vanilla, almond, etc.) in them. It’s nice because we can buy our spices in bulk or grow them and dry them ourselves (from our little urban farm!).

Pizza Friday

Image
  Tonight I made individual pizzas. I used pre-made biscuits (you know, in the tube that you keep in the fridge), my homemade pizza sauce, shredded mozzarella cheese, and pepperonis. I gently smooshed and pulled the biscuits so they were bigger. Then I put the pizza sauce on it. I added about a handful of mozzarella cheese on top of the sauce and put pepperonis on half of them (4 biscuits). I cooked them at 350° for about 15 minutes (we have a convection oven). Once the cheese was a golden brown I pulled them out and put them on plates. I didn’t cut them, but I should have. Here is the ingredients. 1 can pre-made jumbo biscuits (8 count) Shredded Mozzarella Cheese Pepperonis  Pizza Sauce I used tin foil lined cookie sheets to cook them on Here are some pictures: The biscuit before I made it bigger After I made it bigger Add the pizza sauce Add the cheese Add pepperonis (I only did half since we have kids that just like cheese). All done! Obviously you can add whatever toppings...